Free Motion Friday -- Nikki's Quilt
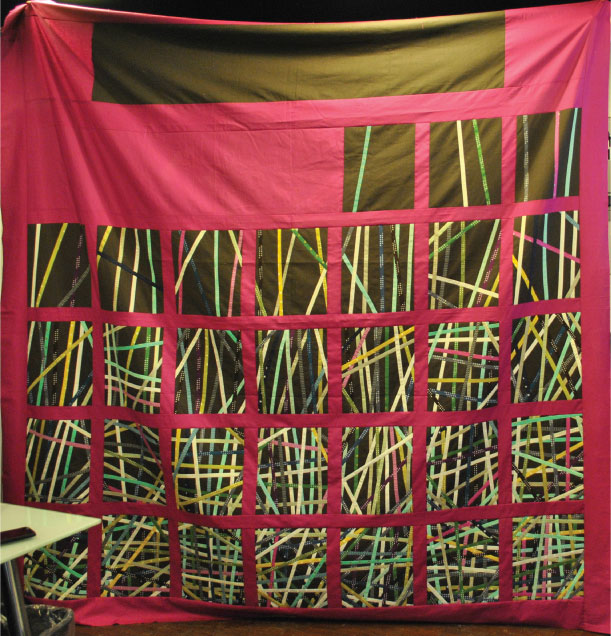
This is Nikki's quilt. Nikki and I meet at QuiltCon in 2013 when we sat next to each other in a class. We've kept in touch since -- including a lunch that went 2 hours later than I thought it would, causing me to miss a couple Quilt Market appointments... oops. She had a couple questions about what batting I used, and so I asked her to send a picture of this quilt for me to play with, even though I knew I wouldn't be able to post until after her deadline.
She says:
Here are 3 pics that I got of the top before I loaded it on the long arm. I'm sorry, they are horrible pics! I was in a mad rush to get the pictures for you so that I could start marking it and quilting it, so I had to take the pic on a Friday afternoon at Matt's work. Needless to say, there weren't many experienced quilt holders around to help. ;)
Just to clarify the pic, the outer borders are 4", all sashing is 2".
I can't wait to see what ideas you have! I've already started on it, but I don't want to instagram any pictures to sway your ideas. ;) So, let me know when you've got a plan in mind and I'll start instagramming some stuff!
Which is why I'm writing this post in the distant past of Jan 31...so she can post her pictures :D So here we go.
I started by drawing a line 2" from the outside of her blocks -- the same width as the sashings. I talked about this method of sashing in THIS POST and is something I love.
Then, we run into trouble with here photos... the sashings don't run straight in the photo, making drawing the quilting in tough... so I decided to draw a new picture.
 I started by doing a straight line 1/4" from the blocks all the way along the horizontal sashings.
Then filling this space with ribbon candy. Which I apparently cannot draw at all today, but hopefully you get the idea.
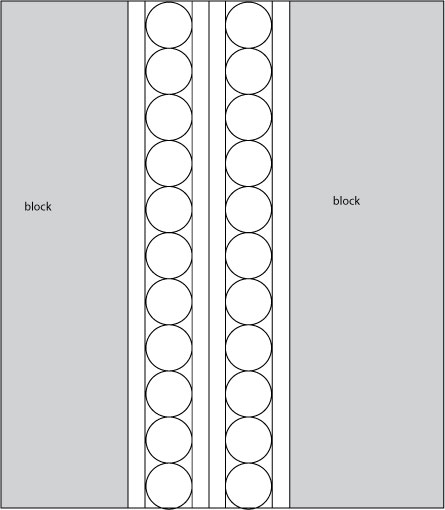
Then, in the vertical sashings, again, a straight line 1/4" (again, erring closer to 3/16th so the middle section is even with the two edges) from the blocks, then 1/2" from that line. I would do this from both edges rather than working from one block to the next so my middle is even. Then fill in the 1/2" space with bubbles.
EDIT: The nice thing about writing blog posts so far in advance is that when I go home and think of a newer better way to quilt it, I can :D So rather than all that 3/16th stuff, I'm just going to do 3 lines in the center to get my 2" sashing filled, so it would go block, 1/4" line, 1/2" line filled with bubbles, two 1/4" lines, 1/2" line filled with bubbles, 1/4" line. Like this:
 Next, the blocks... its a little hard to see, but essentially, in the brown spaces I'd to a 1/4-1/2" echo to fill the negative spaces. On the blocks with fewer strings I might through some ribbon candy in there just to add some interest to the block.
In the strings, most I would leave blanks, but in a few (and in more as there got to be more strings) I'd do some bubbles. Because as there is less and less negative space as there are more and more strings, as there are more and more strings, the bubbles will help add interest and differentiate some of the strings.
I the top brown section I would basically re-create the strings blocks, quilting a bunch of straight lines at various angles, echoing them, and adding some bubbles and ribbon candy.
Then, I'd basically just fill the rest of the background with a fill of somesort. Because the blocks are so linear, I'd want a flowy/curvy fill. I'd probably do something like I did on this quilt with curves and feathers.
So that's Nikki's quilt! You can read her blog and learn more about here HERE.
Remember, if you want your quilt to be a part of Free Motion Friday, send a picture of it to kathleen(at)kathleenquilts.com
Later days! Kathleen.


